


点聚合场景
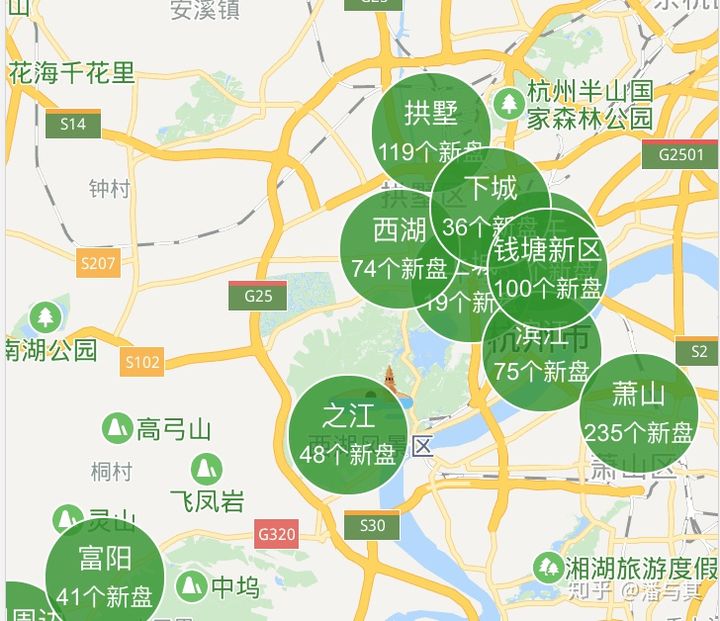
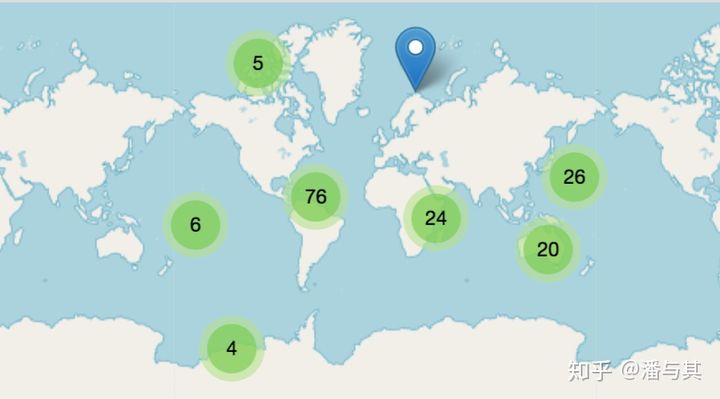
对于展现 Point 要素的点分布图来说,在低缩放等级下同样不需要渲染全量数据,我们可以采用聚合的方式展示点集合的概览。例如下图(不是给安居客打广告哈),随着缩放等级的提升,将出现更多更小的集合,直至最终每个点的分布被展现出来:
在以上点聚合的场景中,我们有两个问题需要解决:
如何聚合?即给定一个点,以此为圆心,如何找到一定半径范围内所有点?
聚合完毕后,给定一个包围盒(例如当前视口),如何找到其中包含的聚合后的要素?
对于这两个问题(radius & range query),在海量点数据下,如果使用暴力遍历每个点的方法必然是低效的。为了高效搜索,我们需要使用空间索引。
空间索引
强烈推荐阅读 Mapbox 工程师的这篇文章:「A dive into spatial search algorithms」,本文后续引用的 k-d tree 的 JS 实现 kdbush 正是出自他手,此外他还写了 r-tree 的 JS 实现 rbush 以及 rbush-knn。
知乎上也有一篇介绍 spatial index 空间索引的文章,介绍了 r-tree、k-d tree、八叉树等实现:
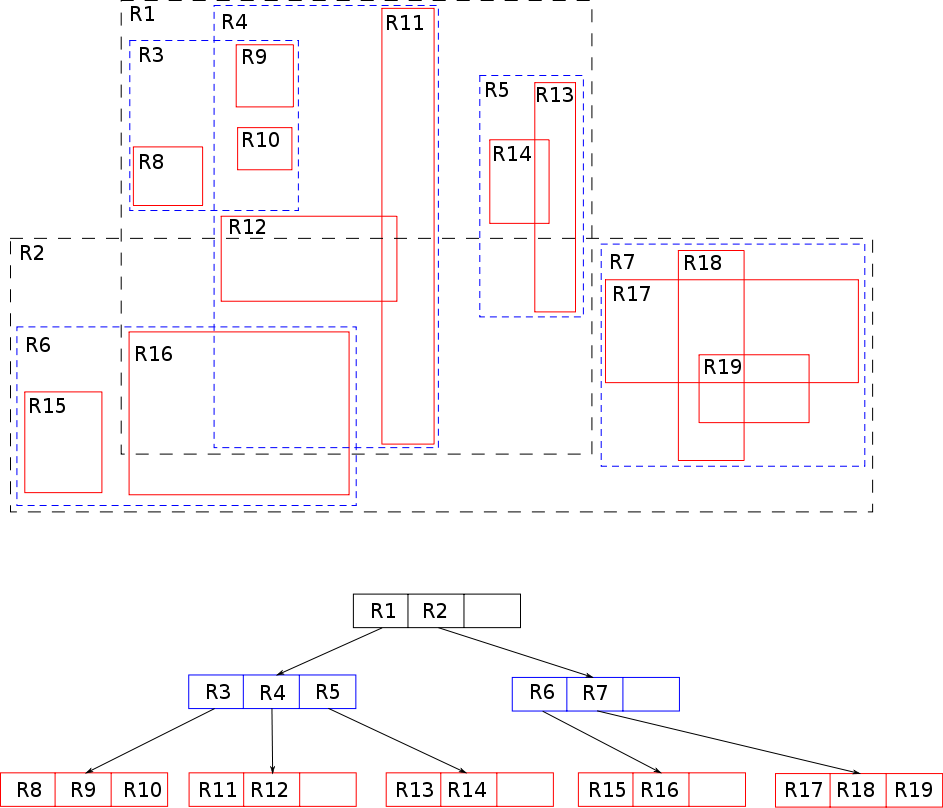
在空间数据库中肯定少不了索引,例如 PostGIS 中的索引就是基于 R-tree 实现的:

除了地理场景,在 光线追踪 场景中,k-d tree 也可用于 Ray 与包围盒的求交,参考玉米关于 PBRT 相关章节的笔记:

限于篇幅本文只介绍 k-d tree 的构建以及查询算法。如果只关心如何在点聚合场景中应用,可以直接跳到最后 DEMO 实现部分。
创建 k-d tree
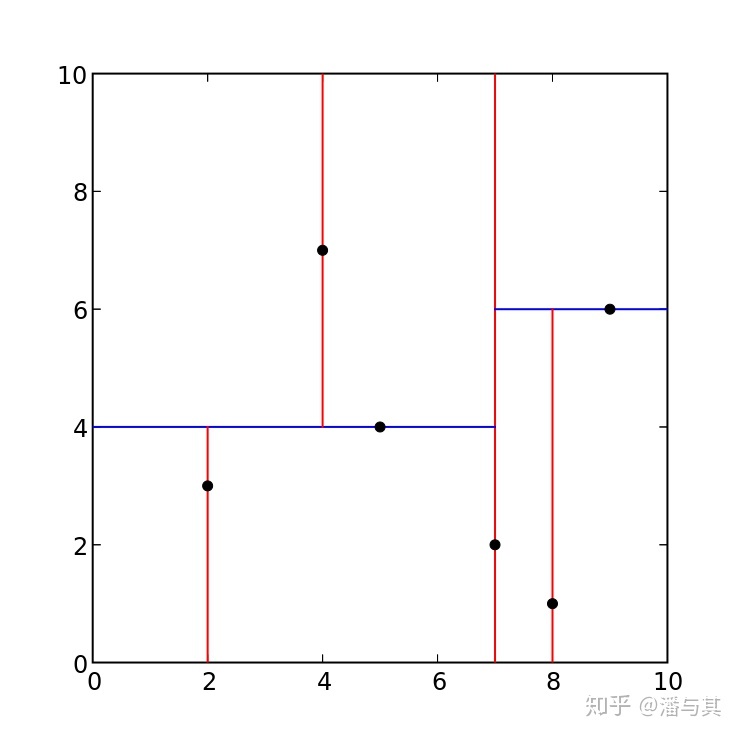
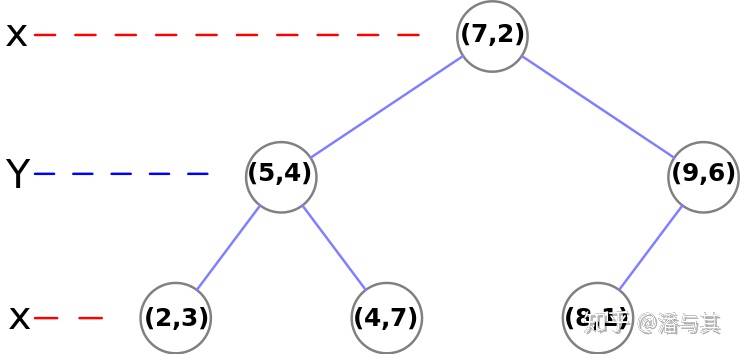
K-d(k-dimensional)tree 是一棵二叉树,每个叶节点都是一个 k 维的点。而每个非叶节点表示分割平面,分割方向在 X 和 Y 轴间交替。下面我们通过 Wiki 中的例子简单感受 k-d tree 的构建过程。
假设我们在空间中有一组点:(2,3), (5,4), (9,6), (4,7), (8,1), (7,2)。通过某种选择算法(下一节会详细介绍),我们首先选定 (7,2),以 X=7(红色) 为分割线将点集分成左右两部分,接着分别在左右两部分中选定 (5,4) 和 (9,6),切换方向以 Y=4 和 Y=6(蓝色)继续分割成上下两部分。
我们以 kdbush 为例,实现上述过程。其中 ids 为索引数组、coords 为点坐标数组,而 axis 代表分割方向。另外,nodeSize 表示每个节点包含点要素数目的阈值,到达这个阈值就停止继续分割。显然,这个阈值设置的越大,建索引的过程就越快,但相应的查询效率也就越低:
// kdbush/src/sort.jsfunction sortKD(ids, coords, nodeSize, left, right, axis) {
    // 到达节点包含要素数目的阈值,停止递归    if (right - left <= nodeSize) return;

    const m = (left + right) >> 1; // 取中点
    // 以分割点 m 和方向 axis,对 ids 和 coords 进行排序,其中 m 之前为左/上部分,之后为右/下    select(ids, coords, m, left, right, axis);

    // 针对左右/上下两部分继续分割,并切换分割方向    sortKD(ids, coords, nodeSize, left, m - 1, 1 - axis);
    sortKD(ids, coords, nodeSize, m + 1, right, 1 - axis);}
上述实现对于 ids 索引数组和 coords 点坐标数组的排序只需要针对最小的前 k 个元素,这类 Top-K 问题可以使用选择算法实现。kdbush 选择了 Floyd-Rivest 算法 ,该算法基于采样来选取 pivot ,细节可以参考 1975 年发表的原论文:
其他著名的选择算法还包括 BFPTR 算法(提出者也包括上面两位大牛),又称为中位数的中位数算法:

对于构建好的 k-d tree,就可以进行 radius 和 range 查询了。我们以后者为例,即查询给定包围盒内包含的要素。为了保证查询性能,不同于构建 k-d tree 的实现,使用了栈+循环实现递归:
// kdbush/src/range.jsfunction range(ids, coords, minX, minY, maxX, maxY, nodeSize) {
    const stack = [0, ids.length - 1, 0];
    const result = [];
    while (stack.length) {
        const axis = stack.pop();
        const right = stack.pop();
        const left = stack.pop();

        // 处理 k-d 树节点,需要逐个点判断是否在包围盒内        if (right - left <= nodeSize) {
            for (let i = left; i <= right; i++) {
                const x = coords[2 * i];
                const y = coords[2 * i + 1];
                if (x >= minX && x <= maxX && y >= minY && y <= maxY) result.push(ids[i]);
            }
            continue;
        }

        // 取中点        const m = (left + right) >> 1;
        // 判断中点本身是否在包围盒内        const x = coords[2 * m];
        const y = coords[2 * m + 1];
        if (x >= minX && x <= maxX && y >= minY && y <= maxY) result.push(ids[m]);

        // 左(上)半边与包围盒相交,入栈递归处理        if (axis === 0 ? minX <= x : minY <= y) {
            stack.push(left);
            stack.push(m - 1);
            stack.push(1 - axis);
        }
        // 右(下)半边与包围盒相交,入栈递归处理        if (axis === 0 ? maxX >= x : maxY >= y) {
            stack.push(m + 1);
            stack.push(right);
            stack.push(1 - axis);
        }
    }// 返回包围盒内点要素的索引列表    return result;}
最后,相比 R-tree,k-d tree 虽然实现简单,但也具有一些局限性。例如只能包含点要素,无法很好地处理点的动态添加和删除。在 supercluster 中也有相关 ISSUE:

现在我们已经了解了 k-d tree 的创建过程以及查询要素方法,接下来我们将结合 supercluster 源码,依次介绍:
为每个缩放等级创建一棵 k-d tree
使用 k-d tree 的 radius 查询,聚合一定范围的点,生成新的点集合要素
使用 k-d tree 的 range 查询,得到视口包围盒内的点集合和原始点要素
创建索引
在点聚合场景中,k-d 树的节点除了原始的 Point 要素,还有聚合生成的点集合要素,后者需要一个聚合后的中心点。
// supercluster/index.jsfunction createCluster(x, y, id, numPoints, properties) {
    return {
        x, // 聚合后的中心点坐标        y,
        zoom: Infinity,
        id, // 包含了第一个点的索引和缩放等级        parentId: -1, // 父集合 ID        numPoints, // 集合包含点数量        properties
    };}
在创建索引阶段中,和上一篇文章介绍的数据瓦片一样,我们需要为每个缩放等级都构建一棵 k-d tree:
// supercluster/index.js// maxZoom 最大缩放等级// minZoom 最小缩放等级let clusters = [];for (let i = 0; i < points.length; i++) {
    if (!points[i].geometry) continue;
    clusters.push(createPointCluster(points[i], i));}// 创建根 k-d 树this.trees[maxZoom + 1] = new KDBush(clusters, getX, getY, nodeSize, Float32Array);// 为每个缩放等级创建一棵 k-d 树for (let z = maxZoom; z >= minZoom; z--) {
    // 创建点聚合,后面详细介绍    clusters = this._cluster(clusters, z);
    this.trees[z] = new KDBush(clusters, getX, getY, nodeSize, Float32Array);}
聚合范围内的点
聚合一定范围的点需要解决两个问题:
使用 k-d tree 的 radius 查询一定半径内的所有邻居,kdbush 中提供了 within 方法
使用范围内的点坐标生成聚合点的坐标,权重为每个子集合包含的点数目
// supercluster/index.js_cluster(points, zoom) {
    const clusters = [];
    const {radius, extent, reduce} = this.options;// 范围半径    const r = radius / (extent * Math.pow(2, zoom));

    for (let i = 0; i < points.length; i++) {// 以当前点为圆心        const p = points[i];// 如果已经处理过(已属于某个聚合后的点集合),直接跳过        if (p.zoom <= zoom) continue;
        p.zoom = zoom;

        // 使用 k-d 树查询半径内所有要素索引        const tree = this.trees[zoom + 1];
        const neighborIds = tree.within(p.x, p.y, r);

        let numPoints = p.numPoints || 1;
        let wx = p.x * numPoints;
        let wy = p.y * numPoints;

        const clusterProperties = reduce ? this._map(p, true) : null;

        // 将缩放等级编码进 id        const id = (i << 5) + (zoom + 1);

        for (const neighborId of neighborIds) {
            const b = tree.points[neighborId];
            const numPoints2 = b.numPoints || 1;
            wx += b.x * numPoints2; // 使用子集合点数目作为权重            wy += b.y * numPoints2;

            numPoints += numPoints2;
            b.parentId = id;
        }// 范围内没有任何邻居,作为单点要素        if (numPoints === 1) {
            clusters.push(p);
        } else {// 创建点集合要素,加权平均后得到中心坐标            p.parentId = id;
            clusters.push(createCluster(wx / numPoints, wy / numPoints, id, numPoints, clusterProperties));
        }
    }
    return clusters;}
查询包围盒
在后续给定包围盒的 range 查询时,需要注意包围盒可能会横跨多个“世界”,此时需要分成东西两个半球包围盒,分别查询后拼接结果:
getClusters(bbox, zoom) {// 保证只展示在一个世界中    let minLng = ((bbox[0] + 180) % 360 + 360) % 360 - 180;
    const minLat = Math.max(-90, Math.min(90, bbox[1]));
    let maxLng = bbox[2] === 180 ? 180 : ((bbox[2] + 180) % 360 + 360) % 360 - 180;
    const maxLat = Math.max(-90, Math.min(90, bbox[3]));

    if (bbox[2] - bbox[0] >= 360) {
        minLng = -180;
        maxLng = 180;
    } else if (minLng > maxLng) {// 分成两个包围盒继续查询        const easternHem = this.getClusters([minLng, minLat, 180, maxLat], zoom);
        const westernHem = this.getClusters([-180, minLat, maxLng, maxLat], zoom);
        return easternHem.concat(westernHem);
    }// 取得缩放等级对应的 k-d tree    const tree = this.trees[this._limitZoom(zoom)];// 查询包围盒包含的要素索引数组    const ids = tree.range(lngX(minLng), latY(maxLat), lngX(maxLng), latY(minLat));
    const clusters = [];
    for (const id of ids) {// 通过索引找到 k-d 树节点        const c = tree.points[id];// 如果该节点是点集合,创建对应的 GeoJSON feature;如果只是单个点,直接返回        clusters.push(c.numPoints ? getClusterJSON(c) : this.points[c.index]);
    }
    return clusters;}
现在我们终于掌握了 k-d tree 的数据结构、创建方法和查询操作,可以着手实现一个简单的点聚合 DEMO 了。
实现 DEMO
数据源依然来自 http://geojson.xyz/,其中包含了 1081 个 Point 要素,我们希望模仿 Mapbox cluster 的效果。
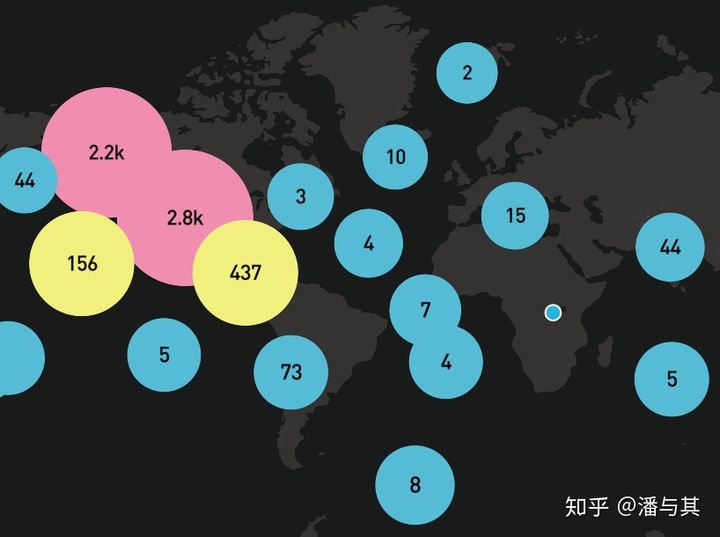
我们希望实现以下三点:
使用数据瓦片方案按需渲染数据,supercluster 提供了 getTile 方法,使用 k-d tree 的 range 查询,根据瓦片坐标返回瓦片范围内的点要素
对于聚合后的点集合要素使用圆形展示,同时将集合内包含点的数目映射到圆形的颜色和半径属性。例如包含点数目越多的集合半径就越大
对于单独的点要素,为了简单也使用圆形(带描边)展示
技术栈依然是 regl + Mapbox CustomLayerInterface,当然还有 supercluster。
首先使用 supercluster 加载 GeoJSON 数据创建基于 k-d tree 的空间索引:
this.tileIndex = new Supercluster({
      maxZoom: 17,
      extent: EXTENT, // 瓦片尺寸      radius: 50 * EXTENT / 512, // 聚合半径});this.tileIndex.load(this.geoJSON);
接下来每次相机更新时获取当前视口覆盖的瓦片,计算每个瓦片的相对坐标矩阵,这部分在上一篇文章中已经介绍过,不再赘述。唯一不同的是这里使用 supercluster 而非 geojson-vt 提供的 getTile 方法根据瓦片坐标系获取要素:
const t = this.tileIndex.getTile(tile.canonical.z, tile.canonical.x, tile.canonical.y);最后,在渲染每个瓦片包含的点、点集合要素时,我们需要在 WebGL 中绘制圆形。
绘制圆点
「WebGL Programing Guide」中介绍了一种基于 PointCoord 的简单实现,在 vertex shader 中通过设置 PointSize 控制半径大小,在 fragment shader 中丢弃掉半径范围之外的 fragment:
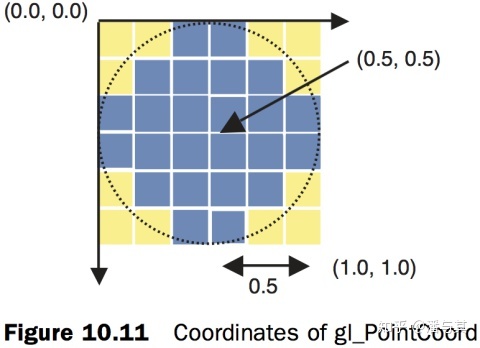
// fragment shaderfloat dist = distance(gl_PointCoord, vec2(0.5, 0.5));if(dist < 0.5) {
    gl_FragColor = vec4(1.0, 0.0, 0.0, 1.0);} else { discard; }
但是这种方法存在以下局限:
无法实现描边
基于屏幕空间,当相机与地面存在倾角时,无法贴合地面
边缘反走样困难,可参考 https://github.com/glslify/glsl-aastep
和之前介绍的绘制直线的方法类似,我们可以对每个原始点进行拉伸,形成两个三角形,手动构建一个点阵坐标系。以下是基于 regl 的实现,使用了 instanced array:
const reglDrawConfig: _regl.DrawConfig = {
  attributes: {
    'a_color': this.regl.prop('a_color'), // instance 属性,点颜色    'a_pos': this.regl.prop('a_pos'), // instance 属性,原始点位置坐标    'a_extrude': [ // 拉伸后的点阵坐标      [-1, -1], [1, -1], [1, 1], [-1, 1]
    ]
  },
  uniforms: {...},
  primitive: 'triangles',
  elements: [ // 分成两个三角形    [0, 1, 2],
    [0, 3, 2]
  ],
  instances: this.regl.prop('instances') // instance 数目};
如果不需要实现“贴地”效果,我们可以在投影之后,在屏幕空间进行拉伸,拉伸距离就是半径 + 描边宽度。这样就手动构建了一个点阵坐标系:
// vertex shader
gl_Position = u_matrix * vec4(a_pos, 0.0, 1.0);
gl_Position.xy += a_extrude * (a_radius + u_stroke_width) * u_extrude_scale * gl_Position.w;
在 fs 中通过 varying 插值后的点阵坐标,可以很容易地实现描边和边缘反走样效果:
// vertex shader
lowp float antialiasblur = 1.0 / DEVICE_PIXEL_RATIO / (radius + stroke_width);

// fragment shader
// 通过 varying 插值
float extrude_length = length(extrude);
// 丢弃半径之外的 fragment + 反走样
float opacity_t = smoothstep(0.0, antialiased_blur, extrude_length - 1.0);

// 描边
float color_t = u_stroke_width < 0.01 ? 0.0 : smoothstep(
  antialiased_blur,
  0.0,
  extrude_length - u_radius / (u_radius + u_stroke_width)
);

gl_FragColor = opacity_t *
  mix(v_color * u_opacity, u_stroke_color * u_stroke_opacity, color_t);
DEMO 效果 & 总结
DEMO 地址:https://xiaoiver.github.io/custom-mapbox-layer/VectorTileClusterLayer.html
GitHub 地址:https://github.com/xiaoiver/cus